Winlink on Linux

Introductory Rant
Digital over Analogue in (((Current Year))) ham radio is an absolute dog’s breakfast of hodge-podgery! I remember watching The Tech Prepper a few years ago in his video entitled Why are digital data modes so difficult? and thinking what an overly complicated gong show this endeavour was. I think Ham Radio would really benefit if some developers sat down and turned out a good, updated stack for digital comms on Linux/Android that would be at least 17% more convenient for the average non-software engineer Ham to use.
Winlink on Linux
I was really stumped for a long time about Winlink Global Radio Email. I watched a few tutorial videos but I could never get it to work right on Linux. It’s pretty straight forward on Windows. But I was missing key setup information that makes it all work together. I finally got it figured out and this post will show what I did to finally send an email over radio on Linux.
The Concept
The over arching idea here is the internet from the 1990s. We are taking digital information and pushing it over analogue communication structure. We know this all gave way to the fully digital internet of today. But these kinds of “digital over analogue” methods are still valuable tools for when you either don’t have internet connectivity or the internet has gone down in some kind of outage.
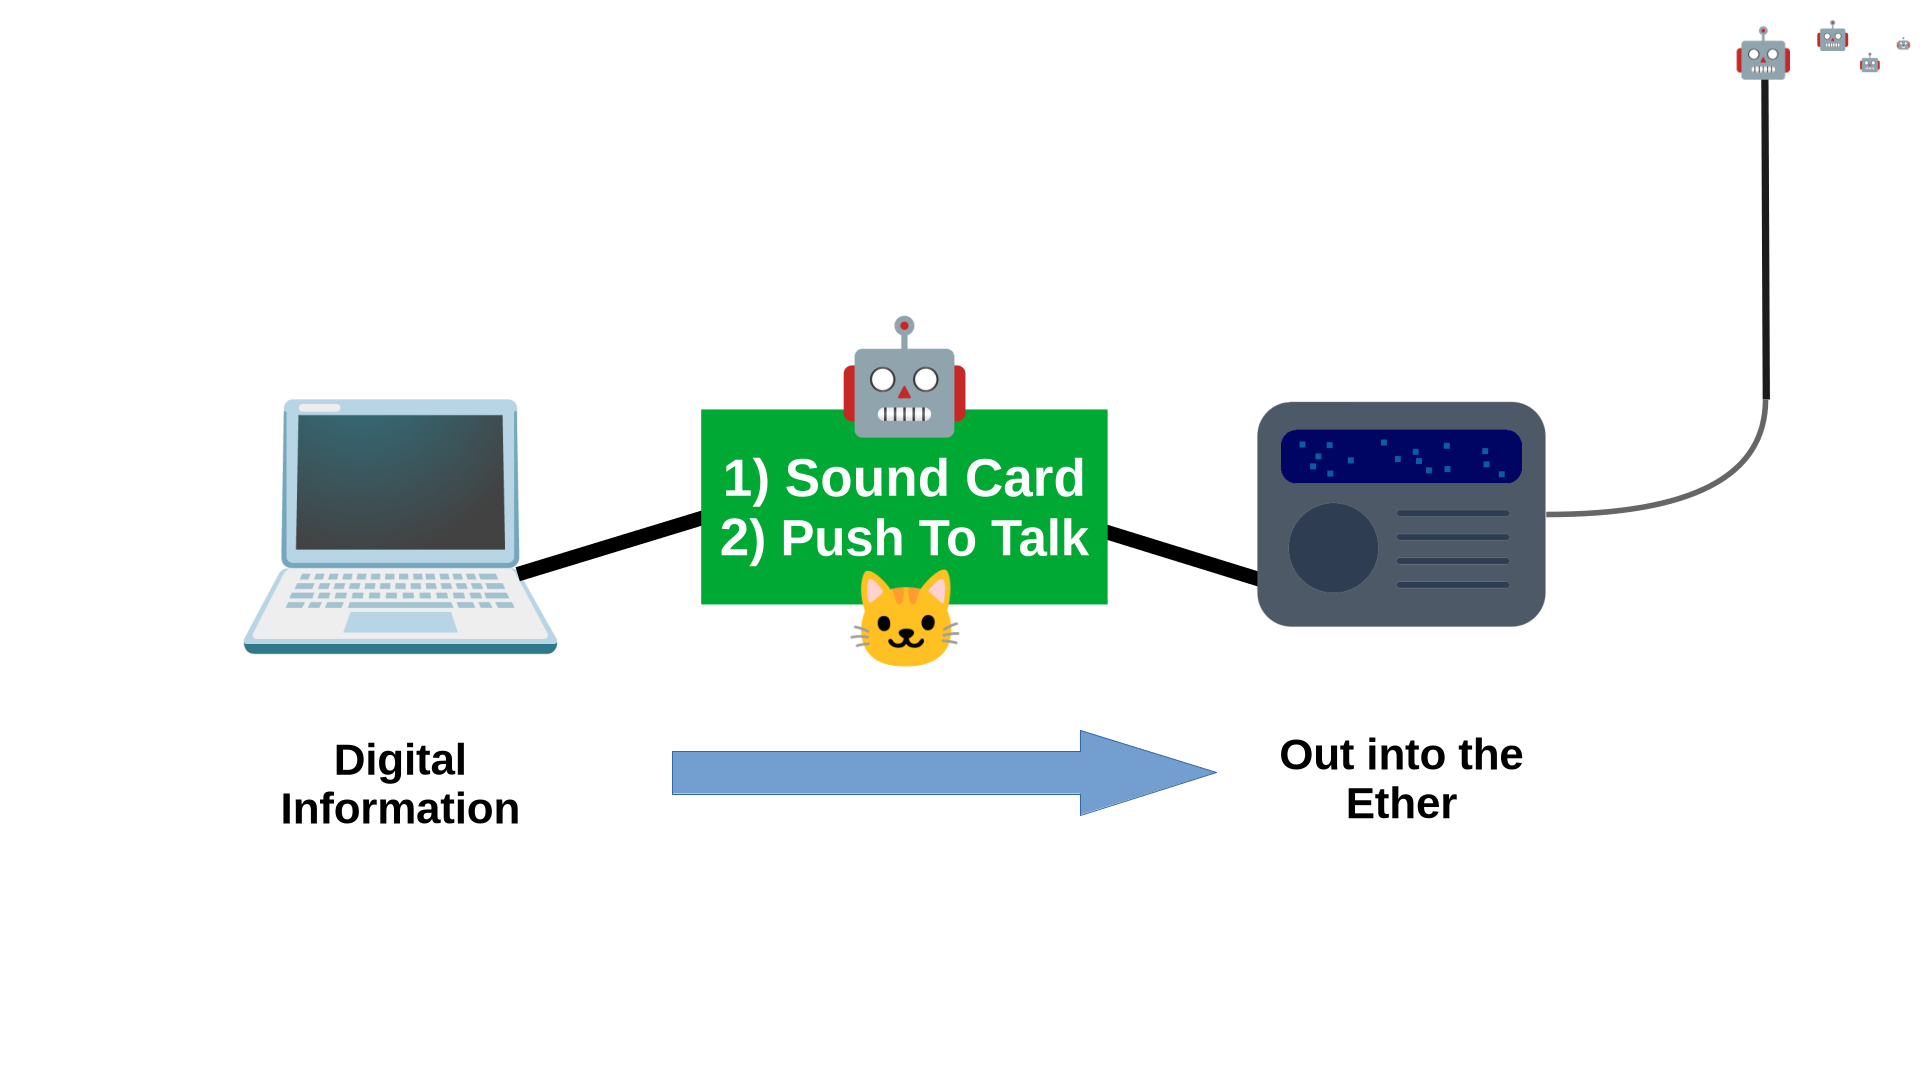
Sound Card
Modern radios are increasingly being designed with built in sound cards as in the case of the Icom IC-705. This is the radio I will be referencing in this post. But there are awesome products available now such as Digirig which give you this connectivity. This will interface your computer to your radio.
PTT and CAT
The other aspect of this is the PTT (Push To Talk) or simply making the radio key up, as if you were pushing the microphone button to talk. This function is critical to enable transmitting the digital packets over the radio. So we need to make sure the computer can tell the radio to key up and also to control/sync to the radio’s frequency. This is called CAT (Computer Aided Transceiver).
Modem
If you recall the 90s internet, everyone had a modem to convert the digital packets to analogue to go over the audio phone lines. That’s the exact same concept for radio. In the old days, Hams would use a TNC (Terminal Node Controller) as a specialized modem to make this work. However now we have various ‘software modems’ taking the place of these hardware devices. A few notable ones are Direwolf, ARDOP, and VARA. This is a critical component you need to have setup.
Linux Software
You need a bunch of software to make this work.
If you haven’t already done this, your user needs to be given access to the serial ports to allow communication to your radio. ‘username’ is your user. ‘dialout’ is the group your user needs to be in.
1
sudo usermod -a -G dialout username
Pat
Pat will be the winlink client we are using. (Aside: ‘Pat’ is for some British kids show with the ‘Postman Pat’ character). It’s cross platform for Linux, Mac and Windows which is fun. You can download the binaries from the Pat github.
VARA
UPDATED FOR 2026
For our modem, we’re going to use VARA. It’s fantastic, but the only bummer is that this is a proprietary windows program. You can purchase a license and get the full speed version, or you can use it for free, albeit throttled, which is what we are going to do. But to run it on Linux have an added level of messing around. Gnome Bottles is very nice and convenient and can be installed as a flatpak. It emulates a Windows install (legally) in a container. It’s super clean and well implemented.
It still requires some configuration but I found this absolutely awesome guide on how to set up VARA in Bottles. I’m not going to reinvent the wheel, just follow Jay’s guide. UPDATE: A key piece of this Bottles deployment is a dependency called vbrun6. This package is broken on the servers and won’t install niceley. In Jay’s guide he suggests a workaround of manually downloading the file. However, I couldn’t get that to work no matter what.
So here is an updated working guide for 2026. Unfortunately we have to do this the messy way with Wine rather than the Chad way with bottles:
Wine Installation
They have implementations for a variety of linux distros. The concepts are the same no matter what you use. This section here will show Ubuntu/Debian. I used Linux Mint and it worked just fine. Work your way through the commandline code snippits in this guide. The following steps are for Linux Mint. In the terminal:
Download and Add Repo Key
1
2
sudo mkdir -pm755 /etc/apt/keyrings
wget -O - https://dl.winehq.org/wine-builds/winehq.key | sudo gpg --dearmor -o /etc/apt/keyrings/winehq-archive.key -
Add 32-bit Architexture:
1
sudo dpkg --add-architecture i386
Add the Sources File:
1
sudo wget -NP /etc/apt/sources.list.d/ https://dl.winehq.org/wine-builds/ubuntu/dists/noble/winehq-noble.sources
Update your Install:
1
sudo apt update
Install Wine:
1
sudo apt install --install-recommends winehq-stable
Configure Wine:
This will setup wine in a hidden directory .wine in your home folder:
1
env WINEPREFIX=~/.wine winecfg
A MS Windows window with tabs will pop up. You can make any changes you need specific to your system. But make sure Windows 10 is selected then click OK.
WineTricks:
This is a helper script to download dependencies for Wine (the stuff that is broken in Bottles).
1
wget https://raw.githubusercontent.com/Winetricks/winetricks/master/src/winetricks
Make it executable:
1
chmod +x winetricks
Copy it so it can run:
1
sudo cp winetricks /usr/local/bin
Install the dependencies:
1
env WINEPREFIX=~/wine64 winetricks
A GUI window will pop up with bullet options. Choose Select the default wineprefix and hit OK.
Then choose Install a Windows DLL or component and hit OK.
Scroll down until you find vb6run hit OK. If you get a bunch of warnings and such it doesn’t matter.
Install VARA:
At long flippin’ last we can install VARA. Goto their site and download it. The have FM and HF and a couple other choices. I use this on HF so that’s what I downloaded. We are telling wine to install the VARA program. All the ‘' slashes are just to comment out the file name spaces that the Linux terminal doesn’t like. Accept all the defaults. This will install VARA as an application you can run from your regular linux application menu.
1
env WINEPREFIX=~/wine64 wine Path/To/Where/Your/VARAfile/is/VARA\ setup\ \ (Run\ as\ Administrator\).exe
Hamlib
You need to have hamlib installed. It’s in your distro’s repos so just search for it and install it. libhamlib-utils on Linux Mint/Debian/Ubuntu. This is going to give us the missing link that caused me much pain and suffering: rigctld
Connections
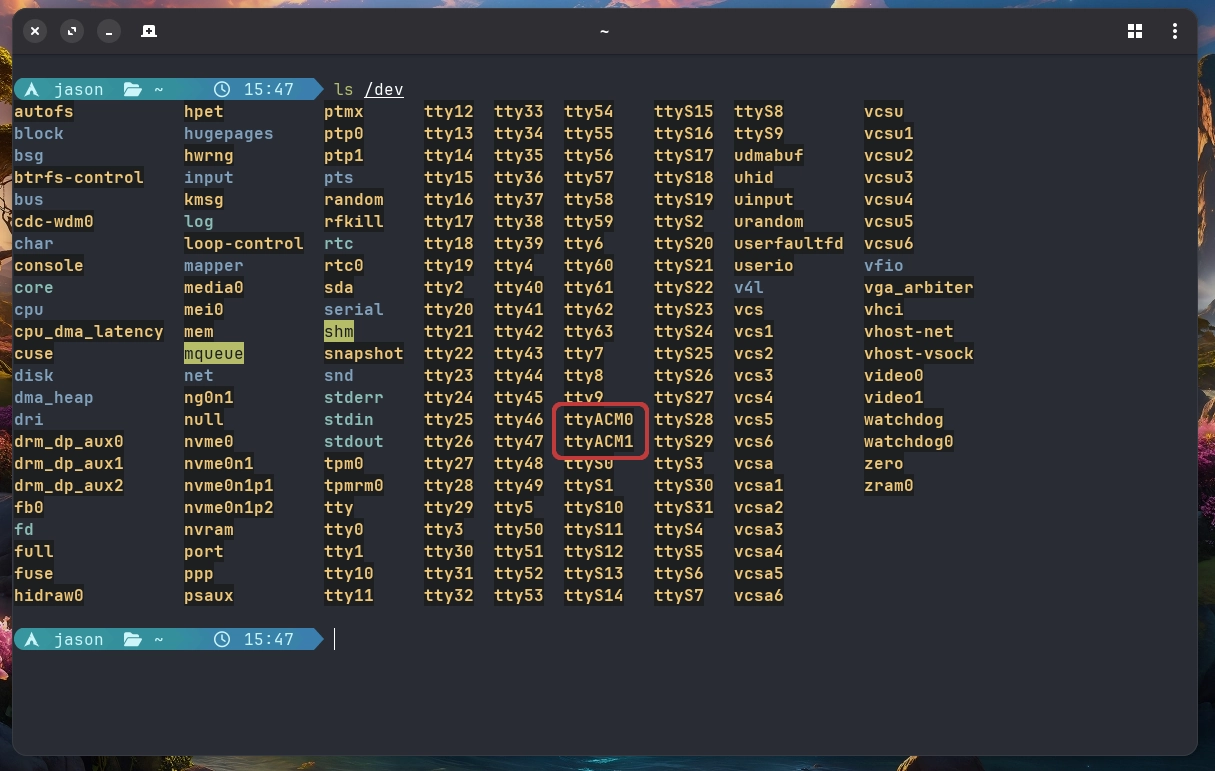
You hook your radio up to computer with whatever interface you’re using. With the IC-705, it’s just a USB cable. This is going to show up in the Linux /dev directory. In terminal:
1
ls /dev
This will display a bunch of stuff but we are looking for ttyACM0 and there should also be ttyACM1 These are the two ports on the IC-705. If you have yours setup to push GPS signals for time syncing the data will be coming into the computer through these connections the same way. Check to make sure you see ttyACM0
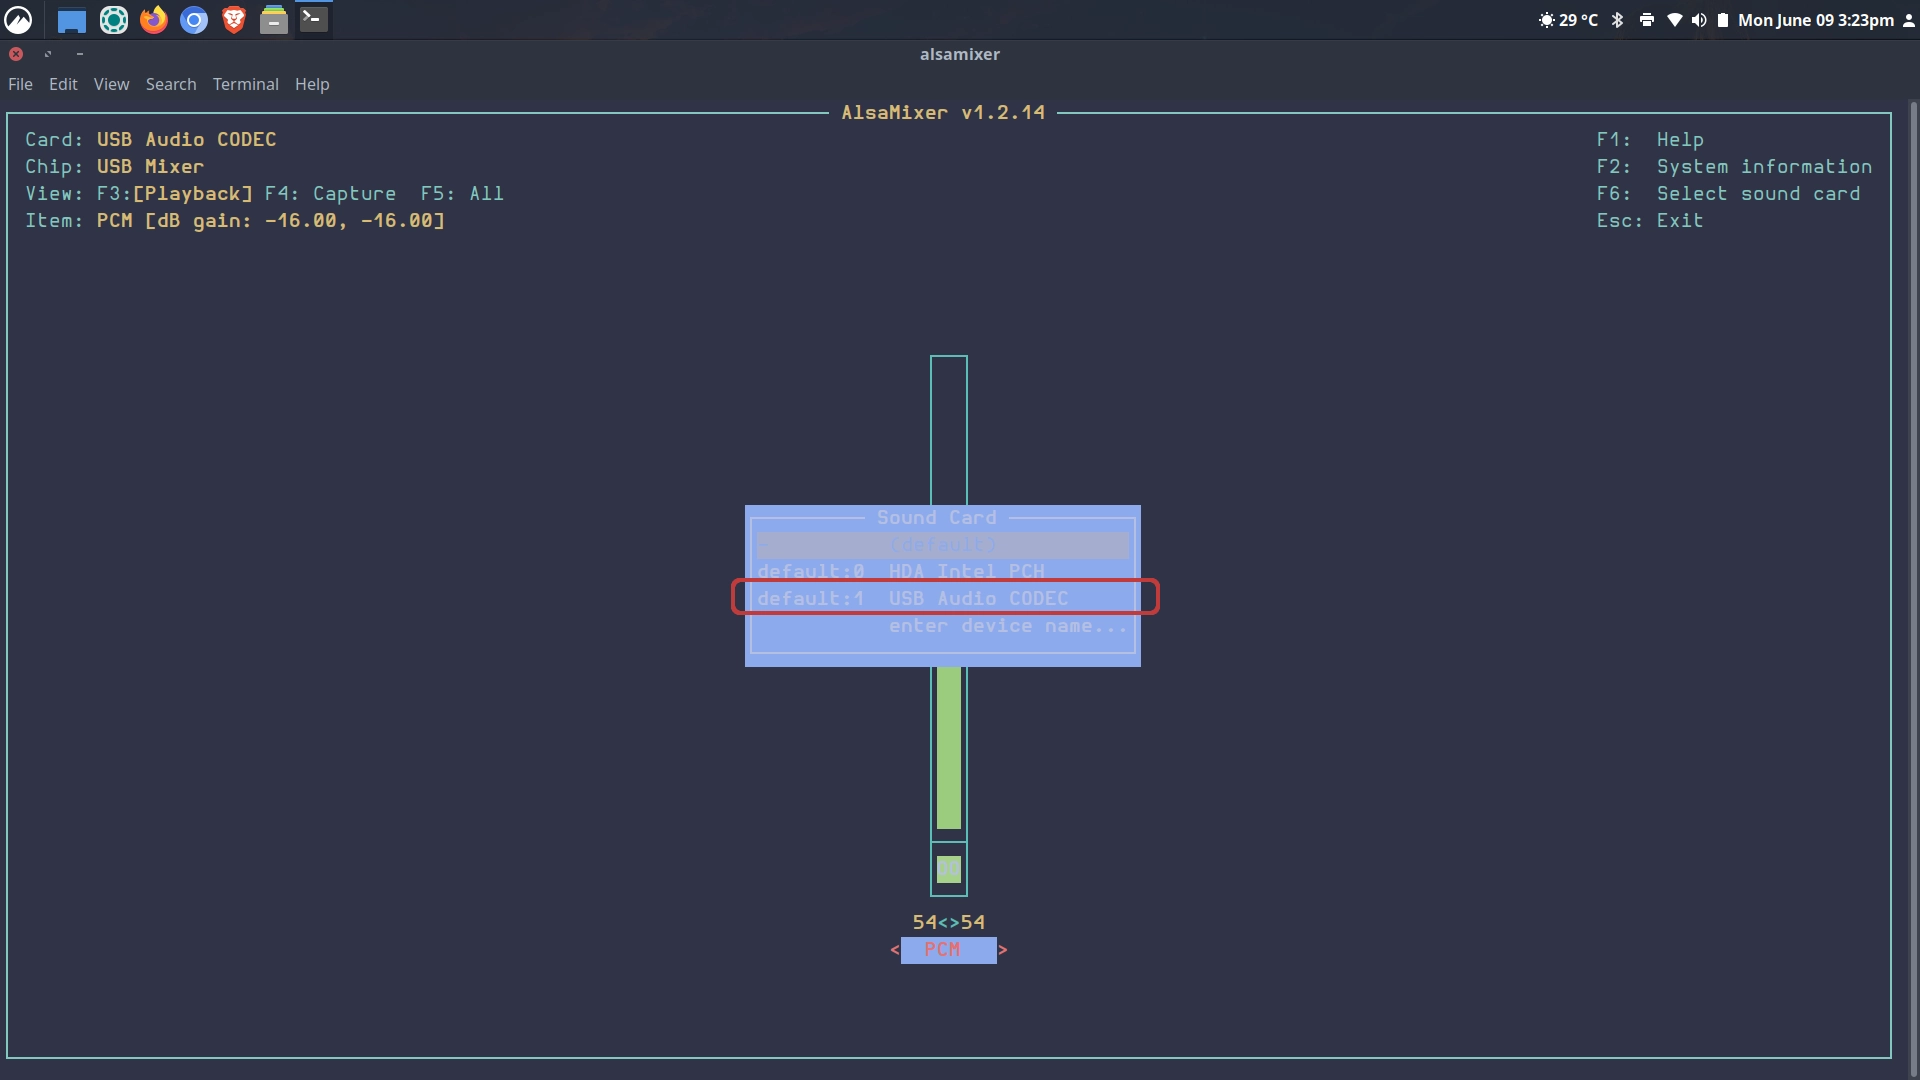
alsamixer
We can use alsamixer to make sure the right sound card is selected. Run it from terminal, then press F6 to select it. In my case it’s USB Audio CODEC. I set the level around 50% and it seemed to work. Adjust accordingly.
rigctld
Pat is the program you need to write and manage emails. VARA is the modem that will convert the data to audio for transmission. But Pat is contingent on rigctld as the ‘bridge’ that connects the two. This was the missing link for me. It needs to be running before Pat will cooperate.
The rigctld command is rather beastly, but we will break each piece down. In terminal you need the following:
1
rigctld -m 3085 -r /dev/ttyACM0 -s 38400 -T 127.0.0.1 -t 4532 &
-m
First you have the rigctld command, then the code for the radio. You find this by typing rigctld -list This will barf out a zillion radio models. So to help find your model you can search the output to narrow it down.
1
rigctld -list | grep IC-705
This will output a few columns. But the first column is the entry for the IC-705 in this case 3085. But if you searched FT-891 instead of IC-705 you’d get 1036. In short, you put your rig number in the command after -m
-r
The next piece is the location of your rig on the Linux file system. In our case, it’s /dev/ttyACM0 This is going to coordinate the PTT and CAT control for Pat.
-s
The next number is the baud rate (Serial Speed). Depending on your radio, you will need to make sure these numbers match. Say if your rig can only do 9600 baud then you put -s 9600 The IC-705 will auto detect this so I put in -s 38400
-T -t
The next thing is where we want the listening IP address port to be. -T 127.0.0.1 This is the loop-back address for your computer itself. So we are telling rigctld to listen to this same computer on port -t 4532 which is the default.
&
The last “and sign” tells rigctld to run in the background.
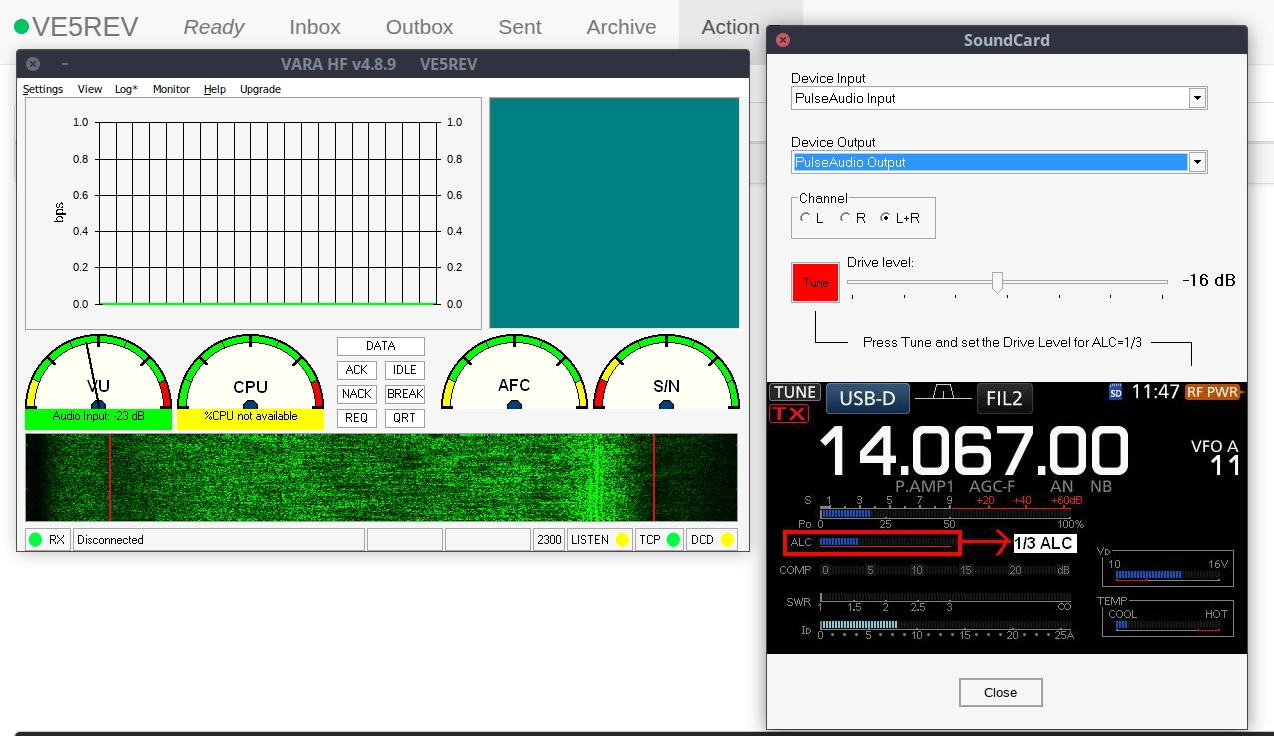
Run VARA
Next you fire up the VARA modem. The only configuration you need to do for VARA is put in your callsign under Settings> VARA Setup…

And then also to select your sound card from Settings> SoundCard… You will also want to set your ALC level as indicated in the screen shot, roughly 1/3 of the way up the meter. For me that was -16db on the slider.
Pat Configuration and First Use
If you’ve never used winklink before, you can use Pat to get started. They will send you a password that you can use to log in to your winlink account on their website. Then you can change your password as you wish. To get Pat to run, from terminal type pat http This will give us a nice web ui to play with instead of just running terminal commands (which you can do if you’d rather but this is nicer).
Then in your web browser of choice type localhost:8080 This will take you to the web ui. Before we configure VARA, you can send an email using telnet (which is just regular internet). This will get you your password from the winlink network. To do that, on the top right menu you will see the Action drop down menu. Click Compose… Write yourself an email to your normal email address. Then click post at the bottom of the email dialogue. This will pop the message into the outbox. Then go back to the Action drop down menu. Click Connect. On the top left click telnet. Leave everything default and click the connect button. You’ll get an email back with the subject ‘Your New Winlink Account’ which will have your winlink password you need for the configuration (which you should first change as mentioned above).
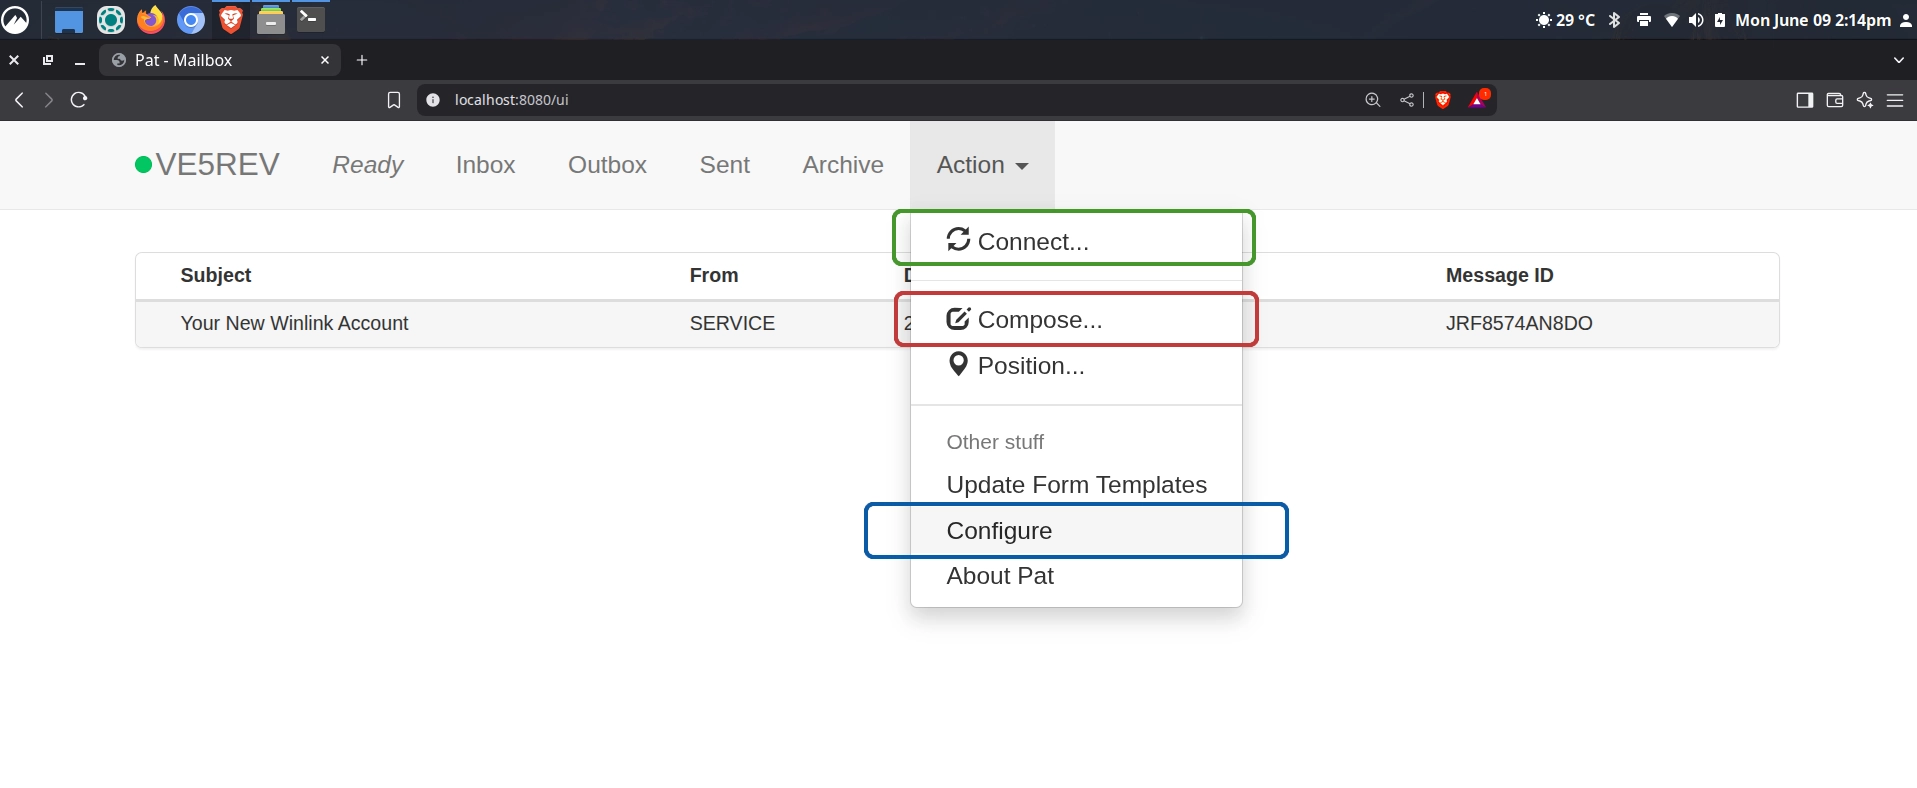
Now we can configure the Pat winklink program. From that same Action menu click Configure. You go through configuration fields with your callsign, maidenhead locator, your changed password, etc. Then scroll down to Rig Control.
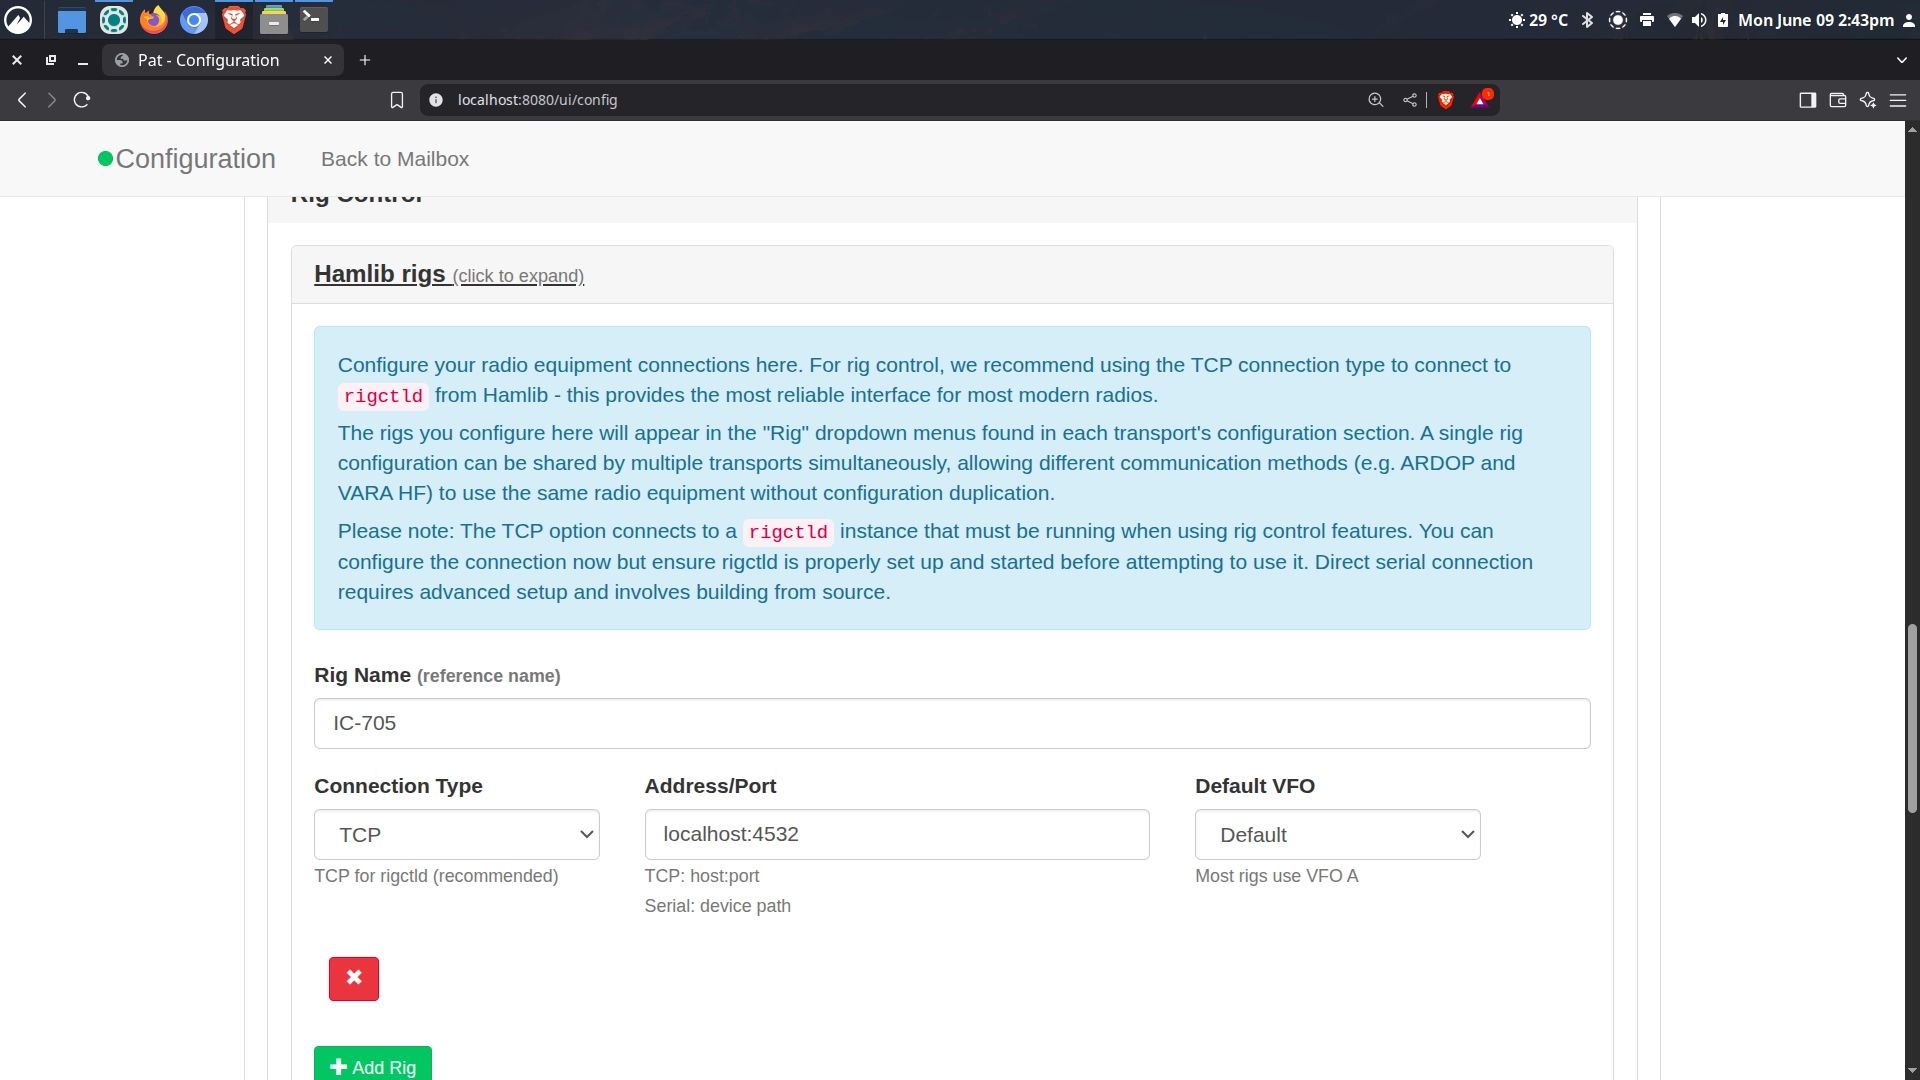
Rig Control Hamlib rigs
I fought with this part for way too long! It’s actually simple. Here you punch in your rig info. Rig Name is just the nickname for your rig. You want TCP for Connection Type. You want localhost:4532 for the Address/Port. That’s it! All the nasty configuration took place above with that super long rigctld command. This setting here just tells Pat where to tap into it.
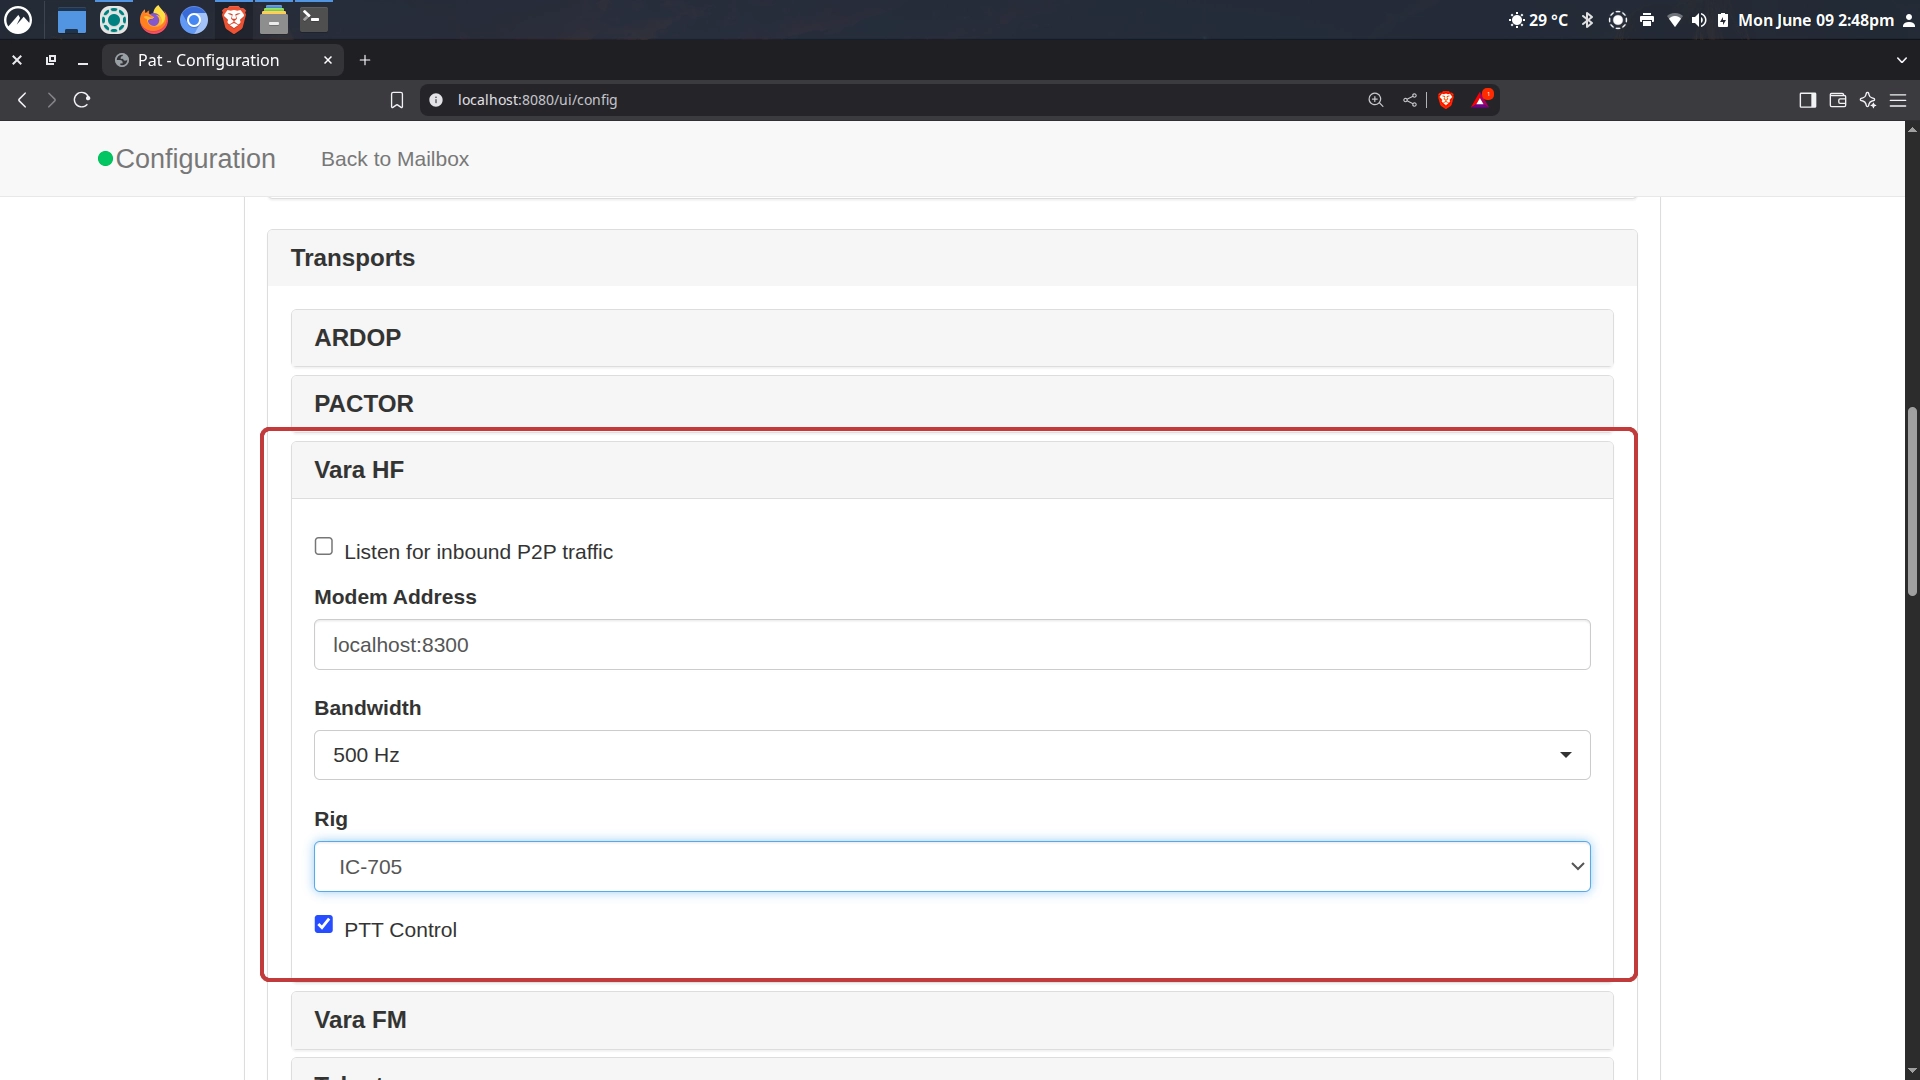
Transports
Scroll back up to Transports. Here we will configure VARA HF and again, this part is easy. Just pick your rig and make sure PTT is checked and leave everything else default.
Connect to a Node
FINALLY, we can try connecting to a node to send an email over radio. From the Action Menu click Connect and select VARA HF. Click the Show RMS list too for a list of all the nodes you can connect to. What I did was select my band (20M) and then I browsed the list and recognized callsigns that I have worked before with CW. WA5TED showed up and I knew I was able to connect with him in Texas previously. I selected his node and all the settings will automagically populate in the Pat window. I clicked Connect and I was able to make the connection. I sent an email to SP9DLM in Poland because I received one from Darek randomly over Winlink and wanted to respond. It worked!

Final Thoughts
This is a really involved process to make work. It’s way too much hassle for the average person. Definitely a native Windows deployment would be much simpler to execute. And, even if you get all this stuff configured correctly, it’s still no guarantee you’ll connect to a node. I tried a few different stations and couldn’t connect due to conditions and such. But, all that aside, it’s a valuable tool for preparedness. And there is no denying how efficient the digital modes are. If developers can throw Linux users a bone with Linux native and updated apps for these kinds of digital over analogue modes, it will only improve going forward.
Quick Steps:
1) alsamixer to select soundcard
1
alsamixer
2) rigctld to connect to radio
1
rigctld -m 3085 -r /dev/ttyACM0 -s 38400 -T 127.0.0.1 -t 4532 &
3) Start VARA (Bottles or via the Wine Install)
4) Start Pat
1
pat http
5) Web Browser navigate to localhost:8080
Further Resources
Jason, KM4ACK has a wealth of resources and helps for Winlink on Linux. Check out his YouTube channel, and especially this video.
Gaston, The Tech Prepper has his EmComm Tools suite in the works which would be very helpful for getting up and rolling quickly with digital modes.
73 de VE5REV